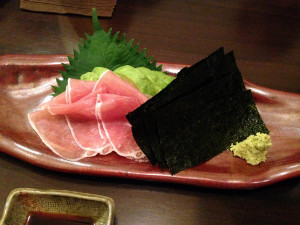
Sake Kasu Zanmai: Hon Maguro Tuna Cheek Kasuzuke Tataki 本まぐろほほ粕漬けたたき

Tataki: Tataki is half well done, half sashimi. I did some tuna cheek tataki. Back in Minnesota, when I was a kid, we used to freeze the cheeks from all the walleye we caught in an entire year to have a single ‘cheek’ dinner. Walleye cheeks aren’t very big, maybe about the size of a baby scallop. An average sized, single maguro tuna cheek on the other hand makes about half a meal!
Seared Tuna Cheek Tataki
This winter at the food court at Fuji Daimaru Department Store in Kyoto, I have often seen maguro cheek for sale in the sashimi section and had wanted to try it. I think I had maguro cheek at a barbecue once fairly soon after I washed up in Japan. And, once a chef friend of mine grilled an entire maguro head for me, as an appetizer — this is a gargantuan meal in itself! But, I really wanted to try some maguro cheek at home. At Fuji Daimaru I noticed that they also offered these tuna cheeks as tataki. Tataki is sashimi on the inside, but seared, cooked well done on the outside. I finally got a torch (just for this article) and put the beautiful sake kasu in my refrigerator to use on this one.
The steps I used are as follows:
1. Rub cheek with salt.
2. Pack in sake kasu and marinade for about 24 hours. (Add sake add needed to increase liquidity.)
3. Lightly wipe sake kasu off.
4. Grill lightly in fish grill (for super fresh tuna this might not be necessary).
5. Sear with torch (you need some high power flame for this).
6. Submerge in ice water.
7. Slice and serve.
Raw Maguro Tuna Cheek

(Sorry, no beagle for scale today.)
Marinading Maguro Tuna Cheek in Sake Kasu

Marinading Maguro Tuna Cheek in Sake Kasu

Kasuzuke: Maguro Tuna Cheek Marinaded in Sake Kasu

Seared Maguro Cheek Tataki – Searing Tuna Cheek with Torch

At this point, the cheek has already been grilled in the fish grill for about 2 minutes per side.
Seared Maguro Cheek Tataki – Searing Tuna Cheek with Torch

Seared Maguro Cheek Tataki – Plunging in Ice Water

The idea here is to ‘stop’ the cooking completely even after the direct heat is removed. (Fish keeps cooking.)
Seared Maguro Cheek Tataki – Plunging in Ice Water

Seared Maguro Cheek Tataki – Plunging in Ice Water

Seared Maguro Cheek Tataki – Sliced

Seared Maguro Cheek Tataki – Served

How Did it Taste?
Even while still raw, I was struck by the sweet fragrance combined with the rich and fatty ‘meatyness’ of the tuna. After it was grilled and seared, this was even more pronounced. The sweetness of the sake kasu and the rich oiliness of the tuna, combined with the seared fragrance was just a little too much, the center is still raw, of course. I had considered squeezing some yuzu, sudachi or daidai orange juice on it, but decided that it wasn’t needed. Even soy sauce was not needed. The sweetness of the kasu was seared onto the surface and the still raw flesh on the inside had more than a hint of sake (This is hand pressed sake kasu so there is quite a bit of alcohol left in it. Also, I marinated this for 48 hours, not 24 and that might have been a bit too long.)
About Tataki and Yakizakana
Usually the tataki preparation is with fresh, sashimi grade fish, and also fine wagyu beef. Kasuzuke fish for grilling is usually cooked all the way, like normal yakizakana. I am not sure about kazuzuke tataki though, it might be a bit nouveau. I did cook it a bit for than normal tataki as it had been marinaded for 48 hours.


WOW! what an interesting way of cooking! I enjoy reading this article! Thank you for submitting!
That looks divine! I’ve made tataki with tuna steak before, but I seared it using a pan, and it came out fine. Is this the way it’s usually done? Have I done it “wrong”? (I say wrong in speech marks, because it still tastes good!)
Hello ira, Thank you! I am always glad to hear people find the information interesting.
Hello Arun, Yes, I have pan seared before. I finally got this torch a few days ago. Previously I have seared fish two ways. One is to put it in the freezer for 30-60 minutes then sear it in an extremely hot pan, then plunge into ice water. The other way is to sear it over the open flame of our gas range. That works ok, but it doesn’t get hot enough to sear it properly. The oil in the fish kind of turns sooty and sticks to the fish flesh. Most of it washes off when it is plunged into ice water, but the sooty taste does remain. So, I would say that the torch is the best method (but you do need a more powerful flame than you might expect, a propane torch, the kind plumbers use, from a hardware store ought to work), next best would be searing in a smoking hot pan.
wow…brilliant photo story…thanks for sharing such lovely pictures….i was wondering which site offers the best ingredients. one of my friend introduced me to a great resource http://www.myethnicworld.com and i thought i can pass great along as well.
Oh, I see. I’ve never actually plunged it into ice water afterward, but that sounds like a good idea now. c: Also, I do have a kitchen torch, but probably no way near as powerful as yours, its just for creme brulee and stuff. It’ll probably just burn any fish I try it on. 😀 Thanks for the advice!
Hi there, just wanted to drop a note and say how much I love your blog and enjoy each and every post! I live vicariously through you! 🙂
If I win the lottery I might stop by when I visit – until then, I may never make it to Japan so you are my virtual guide!
Oh wooww I’m drooling from you photos and description! Mmmmm yumm